Author of this article: p0n1@安比实验
libsnark is currently the most important framework for implementing zk-SNARKs circuits, and is widely used in many private transactions or privacy computing related projects, among which Zcash is the most famous. Zcash used libsnark to implement circuits until the Sapling version was upgraded (it was replaced by bellman later). It is no exaggeration to say that libsnark supports and promotes the first large-scale application of zk-SNARKs technology, filling the gap between the latest theory and engineering implementation of zero-knowledge proof technology.
I hope that through this series of articles, all developers can get started with libsnark in a short period of time, understand the basic concepts of libsnark step by step, learn how to develop zk-SNARKs circuits, complete the generation and verification of proofs, and finally convert zero-knowledge Proof applied to real business.
1. Introduction to the background of zk-SNARKs and libsnark
Zero-knowledge proof may be the most promising and imaginative cryptography black technology at present. And zk-SNARKs is the abbreviation of a type of zero-knowledge proof scheme, the full name is Zero-Knowledge Succinct Non-interactive Arguments of Knowledge. This name contains almost all its technical features, that is, the correctness of a proposition can be proved without revealing any other information, and the final generated proof is succinct (Succinct), which means that the final generated proof is small enough , and has nothing to do with the amount of calculation, it is a constant. In plain English, you can theoretically prove something to everyone else without exposing any privacy, and the generated proof is small in size, and the verification cost is very low, regardless of the amount of calculation required to prove the content. Sounds simply too good to be true!
zk-SNARKs can be applied to many scenarios, such as privacy protection, blockchain expansion, verifiable computing, etc. This article does not introduce the theoretical details of zk-SNARKS and zero-knowledge proofs. Students who are not familiar with or want to learn more can read other articles or papers.
Such as Vitalik's famous three blog posts about zk-SNARKs.
https://medium.com/@VitalikButerin/quadratic-arithmetic-programs-from-zero-to-hero-f6d558cea649
https://medium.com/@VitalikButerin/exploring-elliptic-curve-pairings-c73c1864e627
https://medium.com/@VitalikButerin/zk-snarks-under-the-hood-b33151a013f6
Or read what Xiang Cheng @HUST wrote"Zk-SNARKs of zero-knowledge proof in simple terms", and Dongze wrote"Talking about zero-knowledge proof II: short no-interaction proof (SNARK)"。
Of course, welcome to pay attention to Ambi Labandand"Learning zk-SNARK from scratch" series, and from Ambi Labs maintained"Zero Knowledge Proof Learning Resources Summary"Find more information in.
The protagonist of this article, libsnark, is a C++ code library for developing zk-SNARKs applications, developed and maintained by SCIPR Lab. The theoretical basis behind the libsnark engineering implementation is a series of important papers in the direction of zero-knowledge proofs, especially zk-SNARKs, in recent years (especially since 2013). Some of the most famous ones are as follows:
[GGPR13] Quadratic span programs and succinct NIZKs without PCPs , Rosario Gennaro, Craig Gentry, Bryan Parno, Mariana Raykova, EUROCRYPT 2013
[PGHR13] Pinocchio: Nearly Practical Verifiable Computation , Bryan Parno, Craig Gentry, Jon Howell, Mariana Raykova, IEEE Symposium on Security and Privacy (Oakland) 2013
[BCGTV13] SNARKs for C: Verifying Program Executions Succinctly and in Zero Knowledge , Eli Ben-Sasson, Alessandro Chiesa, Daniel Genkin, Eran Tromer, Madars Virza, CRYPTO 2013
[BCIOP13] Succinct non-interactive arguments via linear interactive Proofs , Nir Bitansky, Alessandro Chiesa, Yuval Ishai, Rafail Ostrovsky, Omer Paneth, Theory of Cryptography Conference 2013
[BCTV14a] Succinct non-interactive zero knowledge for a von Neumann architecture , Eli Ben-Sasson, Alessandro Chiesa, Eran Tromer, Madars Virza, USENIX Security 2014
[BCTV14b] Scalable succinct non-interactive arguments via cycles of elliptic curves , Eli Ben-Sasson, Alessandro Chiesa, Eran Tromer, Madars Virza, CRYPTO 2014
[Groth16] On the Size of Pairing-based Non-interactive Arguments , Jens Groth, EUROCRYPT 2016
The developers of libsnark are also top scholars or research experts in this field, such as Eran Tromer, who is the co-author of many of the above papers.

The solid theoretical foundation and engineering capabilities enable the authors of libsnark to simplify the complexity, realize the advanced theories and complex formulas shown in the figure below one by one, and abstract the concise interface with a high degree of engineering for the convenience of developers. Kudos to these pioneers who extended extraordinary theoretical research to larger-scale applications.
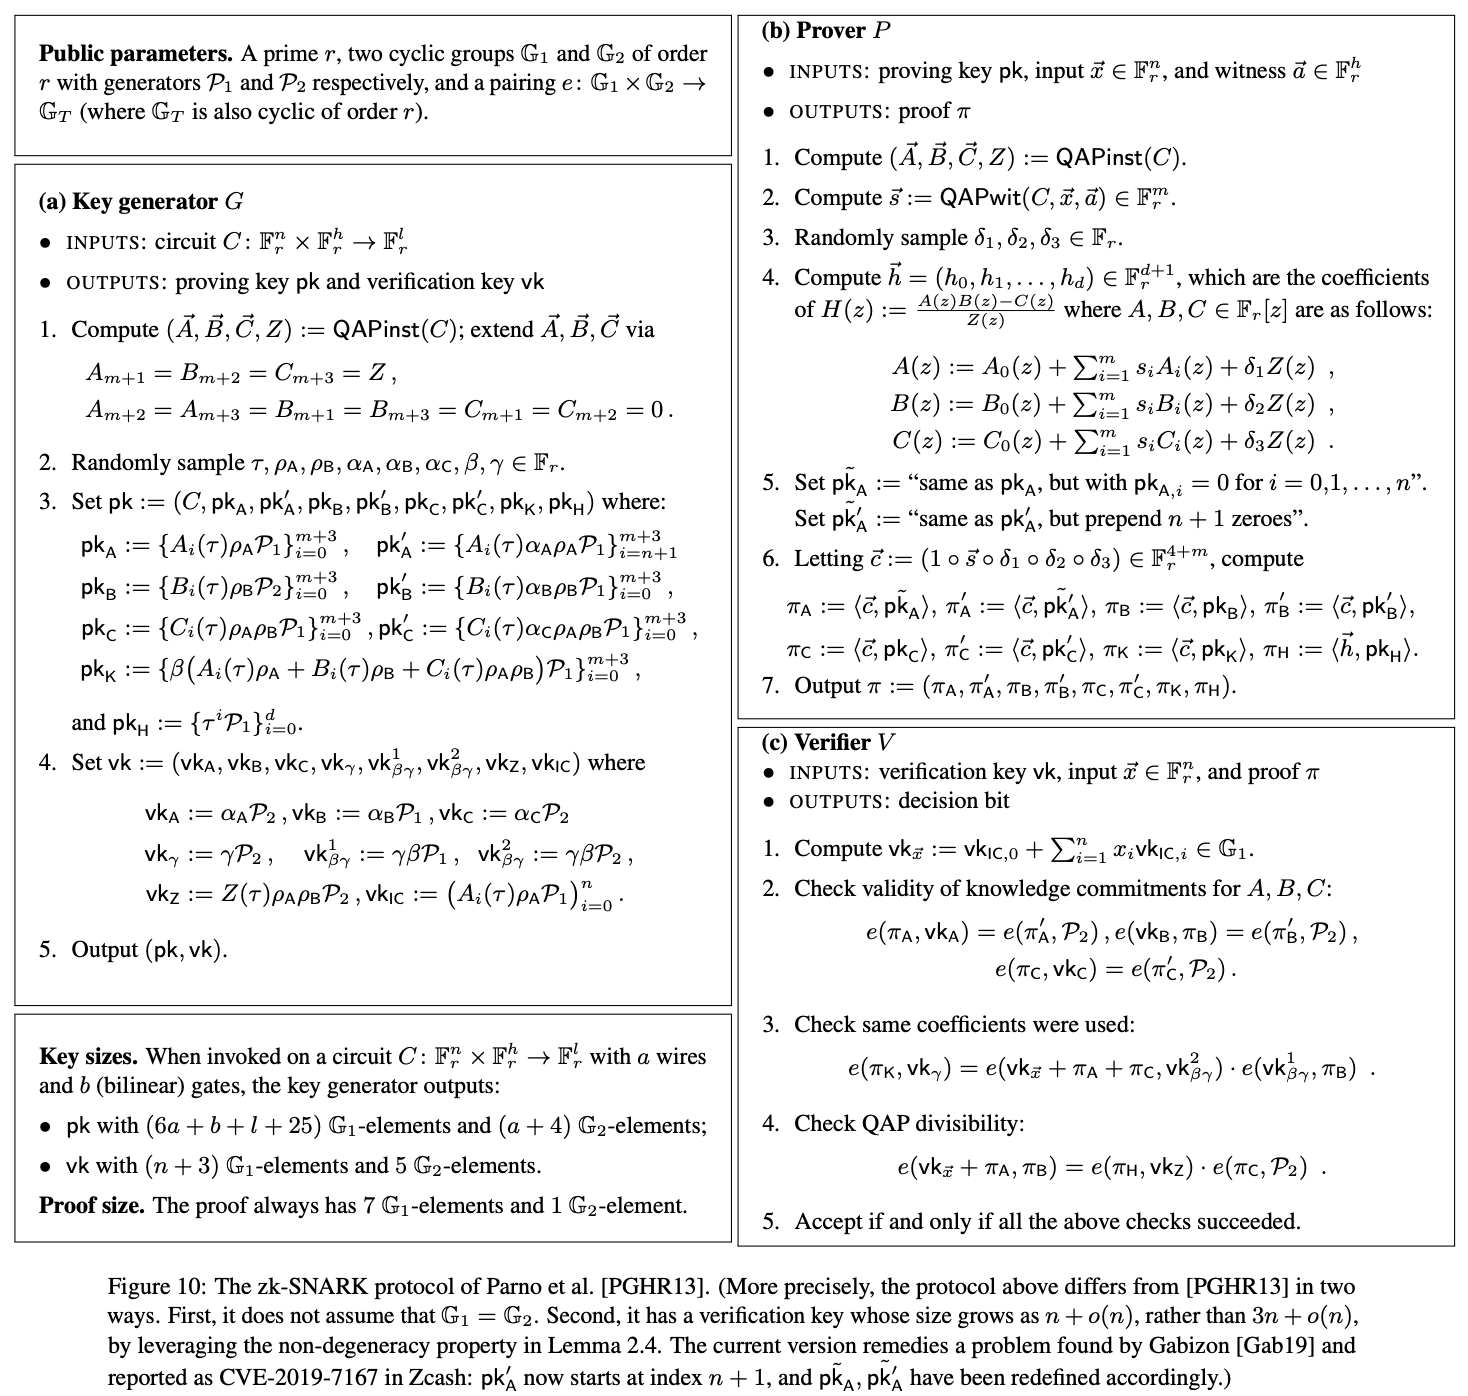
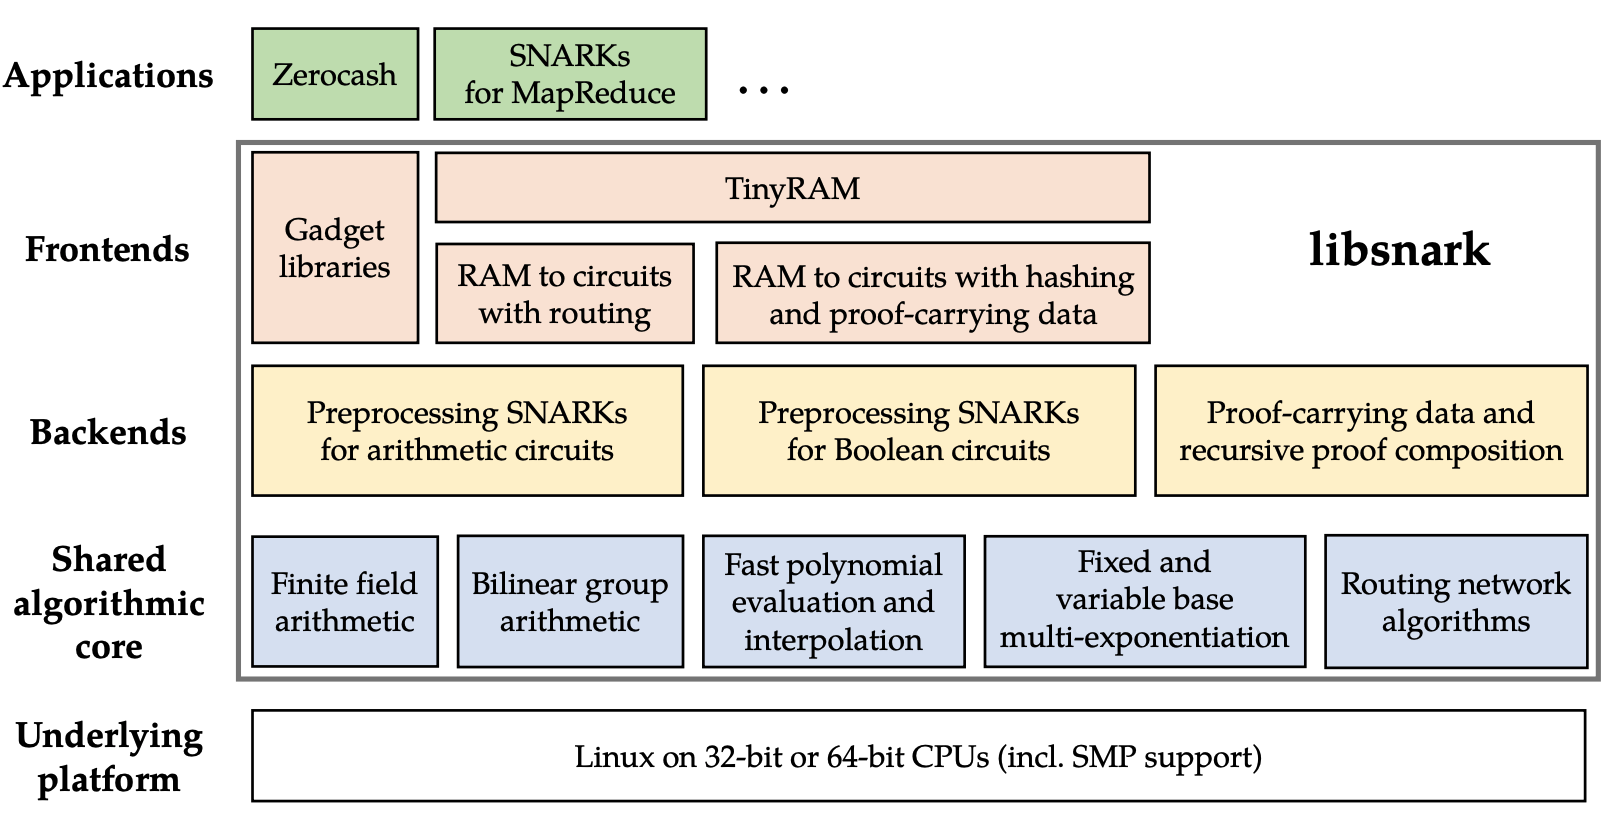
The following figure is a module overview of libsnark, taken from Madars Virza, the first author of libsnark code contribution, at MITPhD thesis。
)
The libsnark framework provides the implementation of multiple general proof systems, among which BCTV14a and Groth16 are used more.
in:
in:
zk_proof_systems/ppzksnark/r1cs_ppzksnark corresponds to BCTV14a
zk_proof_systems/ppzksnark/r1cs_gg_ppzksnark corresponds to Groth16
If you want to study the implementation details of these two protocols, you can start directly from these two directories. ppzksnark refers to preprocessing zkSNARK. The pp/preprocessing here actually refers to the trusted setup we often say, that is, before the proof is generated and verified, it is necessary to create related public parameters (proving key and verification key) through a generation algorithm. We also refer to this pre-generated parameter as the "Common Reference String" (Common Reference String), or simply asCRS。
2. Basic principles and steps
Using the libsnark library to develop zk-SNARKs applications can be briefly summarized as the following four steps in principle:
Express the proposition to be proved as R1CS (Rank One Constraint System)
Generate public parameters for this proposition using a generative algorithm (G)
Generate a proof of R1CS satisfiability using a proof algorithm (P)
Use the verification algorithm (V) to verify the proof
This articleThis article。
There is such a function C(x, out), which is used to judge whether the secret x satisfies the equation x^3 + x + 5 == out, and returns true if it is satisfied.
function C(x, out) {
return ( x^3 + x + 5 == out );
}
In the first step, we need to express the function C(x, out) in libsnark. It is omitted here, and the detailed process will be introduced later.
The second step, corresponding to the following Generator function (G), lambda is randomly generated, which is often said to be generated during the trusted setup process"toxic waste". People like to call it "toxic waste" because it must be properly disposed of (eg, it must be destroyed, and no one can know about it), otherwise it will affect the security of the proof protocol.
lambda <- random()
(pk, vk) = G(C, lambda)
Finally, proving key (pk) and verification key (vk) are generated.
The third step corresponds to using the Prove function (P) to generate a proof. What I want to prove here is that the prover knows a secret value x and the calculation result out can satisfy the equation. Therefore, pass x, out and pk as input to P, and finally generate a proof.
proof = P(pk, out, x)
The fourth step is to use the Verify function (V) to verify the proof, pass proof, out and vk to G, and then prove that there is a secret value that satisfies the equation without revealing the secret.
V(vk, out, proof) ?= true
The developer's main workload is concentrated on the first step, which needs to write C++ circuit codes to describe propositions by hand according to libsnark's interface rules, and construct R1CS constraints from the codes. The whole process also corresponds to Computation -> Arithmetic Circuit -> R1CS in the figure below.

3. Build zk-SNARKs application development environment
Let's enter the hands-on link, quickly get started with libsnark, and run through the examples.
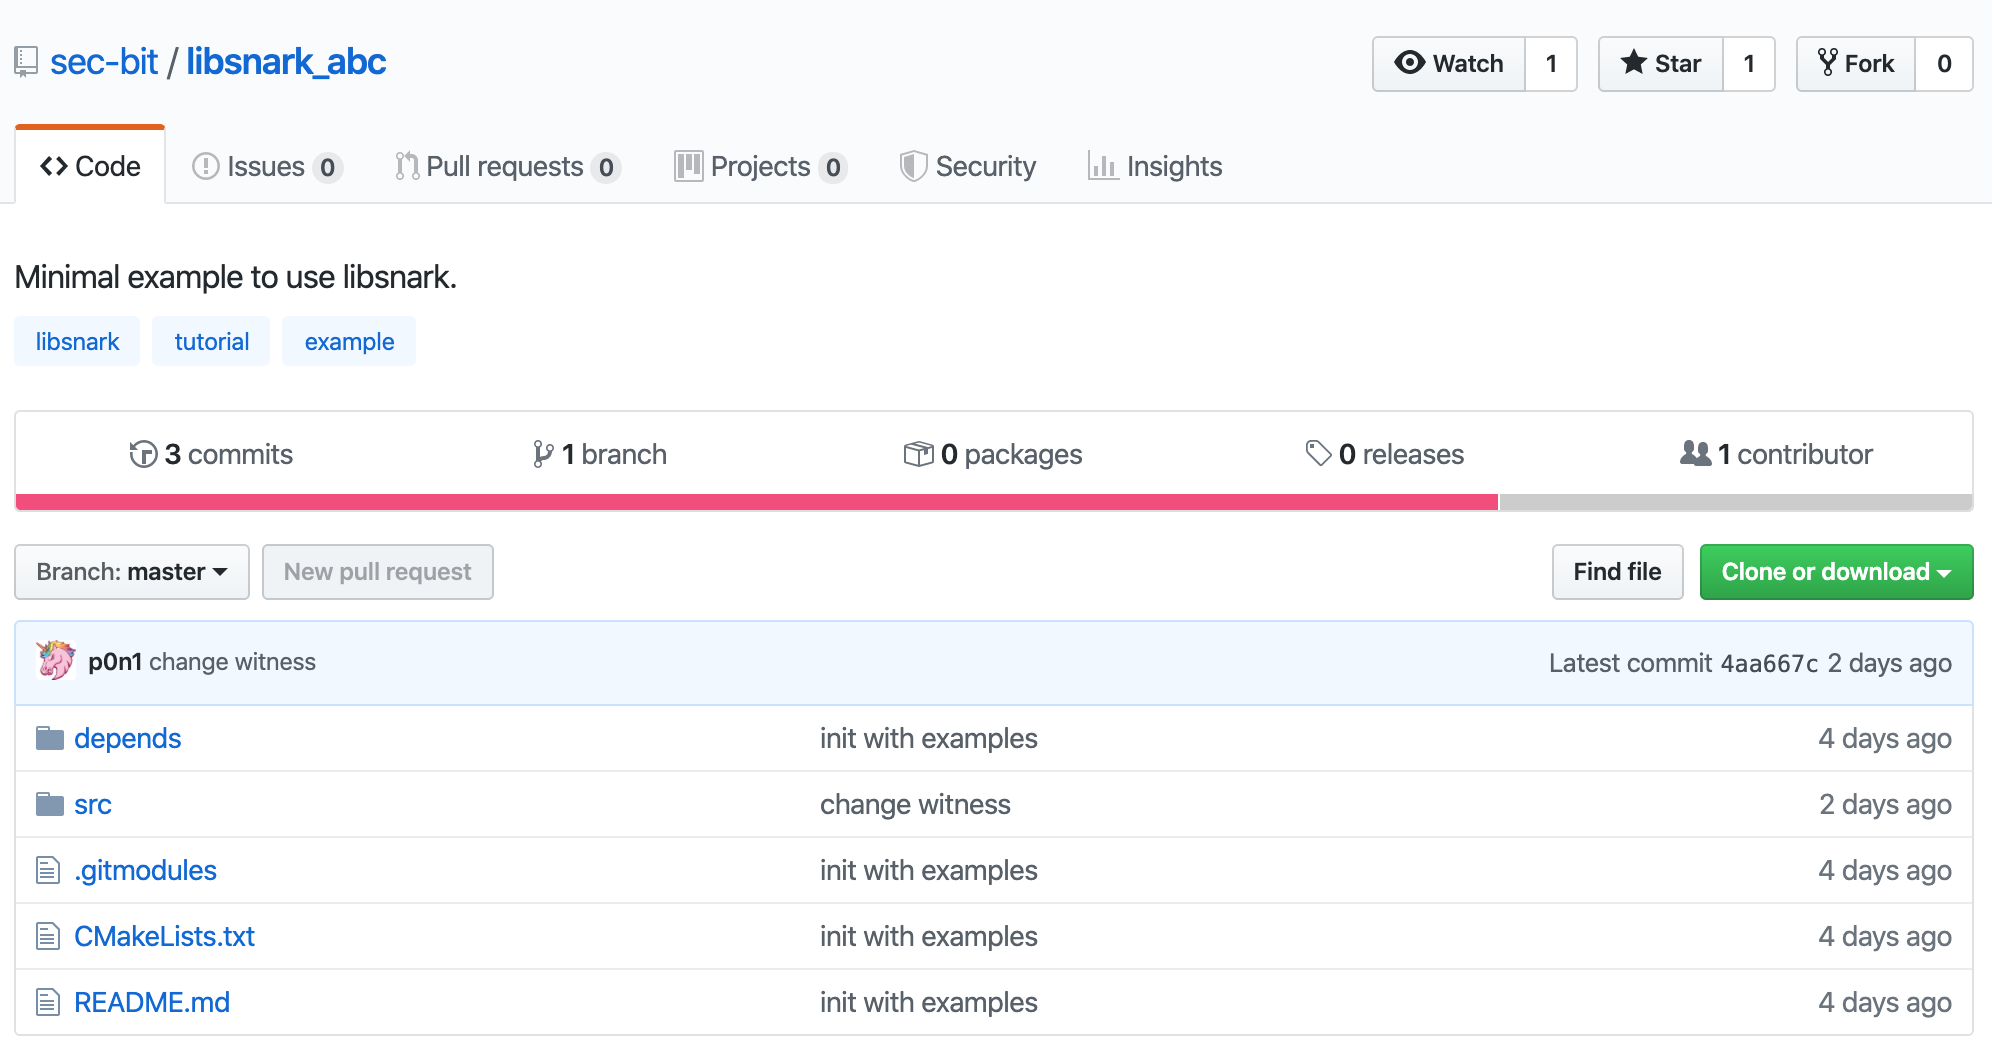
First download the libsnark minimum available example code library libsnark_abc corresponding to this article.
git clone https://github.com/sec-bit/libsnark_abc.git
Pull libsnark code via git submodule.
cd libsnark_abc
git submodule update --init --recursive
Reference libsnarkproject documentationComplete the relevant dependency installation. Taking Ubuntu 16.04 LTS as an example, the following components need to be installed:
sudo apt-get install build-essential cmake git libgmp3-dev libprocps4-dev python-markdown libboost-all-dev libssl-dev
Initialize the build folder.
mkdir build && cd build && cmake ..
This step may encounter problems in the macOS system, refer tothis issuedeal with. or try using the following command:
mkdir build && cd build && CPPFLAGS=-I/usr/local/opt/openssl/include LDFLAGS=-L/usr/local/opt/openssl/lib PKG_CONFIG_PATH=/usr/local/opt/openssl/lib/pkgconfig cmake -DWITH_PROCPS=OFF -DWITH_SUPERCOP=OFF ..
After success, it is still compiled in the build directory.
make
After successful compilation, you can see 3 binary files in the build/src directory.
main
range
test
At this point, you have completed the compilation of the sample project. Try running the sample code.
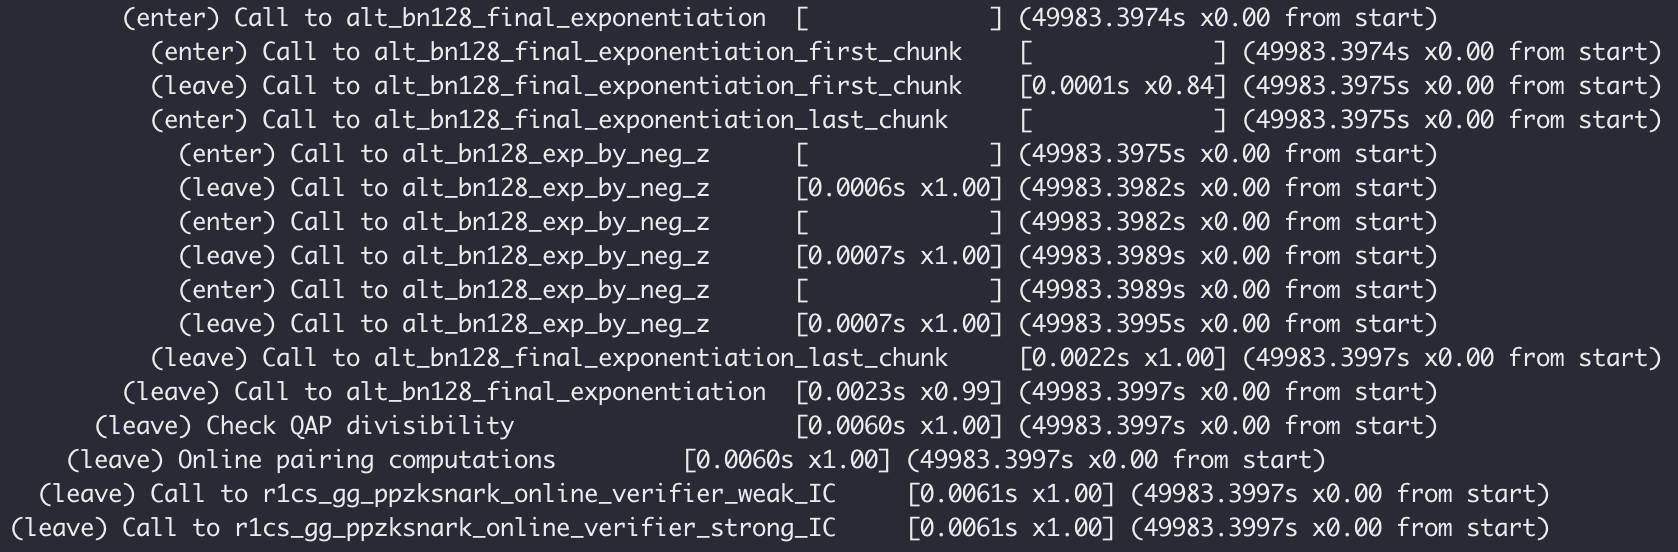
./src/main
Finally, the following log appears, indicating that everything is normal. You have successfully owned the zkSNARK application development environment and successfully ran the first zk-SNARKs demo.
4. Understand the sample code
Let's take a closer look at the code together. The sample project contains 3 codes (see also the appendix at the end of the article).
Let's take a look at src/main.cpp first. This example comes from Howard Wu'slibsnark_tutorial, he is also one of the authors of libsnark. The project structure of libsnark_abc in this article is built according to his libsnark_tutorial, which belongs to the "officially recommended style", please rest assured to eat it😆.
There are only dozens of lines of code, of which run_r1cs_gg_ppzksnark() is the main part. It is easy to find that the real working substantive code is only the following 5 lines.
r1cs_gg_ppzksnark_keypair
r1cs_gg_ppzksnark_processed_verification_key
r1cs_gg_ppzksnark_proof
const bool ans = r1cs_gg_ppzksnark_verifier_strong_IC
const bool ans2 = r1cs_gg_ppzksnark_online_verifier_strong_IC
You can see what each step is doing just from the "super long" function name, but you can't see the details of how to construct the circuit. In fact, here is just calling the built-in r1cs_example, hiding the implementation details.
That being the case, let us learn the circuit details through a more intuitive example. Study src/test.cpp, this example is adapted from Christian Lundkvist'slibsnark-tutorial。
Only three header files are referenced at the beginning of the code, namely:
#include
#include
#include
As mentioned earlier, r1cs_gg_ppzksnark corresponds to the Groth16 scheme. The gg is added here to distinguish r1cs_ppzksnark (that is, the BCTV14a scheme), which means Generic Group Model (general group model). The security proof of Groth16 relies on the Generic Group Model, which trades stronger security assumptions for better performance and shorter proofs.
The first header file is to introduce the default_r1cs_gg_ppzksnark_pp type, and the second is to introduce various interfaces related to the proof. pb_variable is used to define circuit-related variables.
Next, some initialization is required to define the finite field used and initialize the curve parameters. This is the equivalent of every preparation.
typedef libff::Fr
default_r1cs_gg_ppzksnark_pp::init_public_params();
Next, it is necessary to clarify what the "proposition to be proved" is. Here we might as well use the previous example to prove that the secret x satisfies the equation x^3 + x + 5 == out. This is actually a Vitalik blog post"Quadratic Arithmetic Programs: from Zero to Hero"Examples used in . If you are new to the changes below, try reading this blog post.
By introducing intermediate variables sym_1, y, and sym_2, x^3 + x + 5 = out is flattened into several quadratic equations, and several expressions that only involve simple multiplication or addition correspond to the multiplication gate and addition in the arithmetic circuit. method. You can easily draw the corresponding circuit on paper.
x * x = sym_1
sym_1 * x = y
y + x = sym_2
sym_2 + 5 = out
Usually the article here will introduce how to arrange the above equations in the form of R1CS, and deduce the specific corresponding vector step by step. This is helpful for understanding how to convert Gate to R1CS, but it is not the core purpose of this article. So a hundred words are omitted here.
The variables associated with the proposition are defined below. The protoboard created first is an important concept in libsnark. As the name implies, it is a prototype board or breadboard, which is used to quickly build a circuit. In a zk-SNARKs circuit, it is used to associate all variables, components and constraints. The following code defines all variables that require external input and intermediate variables.
// Create protoboard
protoboard
// Define variables
pb_variable
pb_variable
pb_variable
pb_variable
pb_variable
Next, connect each variable with the protoboard, which is equivalent to inserting each component into the "breadboard". The second string type variable of the allocate() function is only used for comments during DEBUG, and it is convenient to view logs during DEBUG.
out.allocate(pb, "out");
x.allocate(pb, "x");
sym_1.allocate(pb, "sym_1");
y.allocate(pb, "y");
sym_2.allocate(pb, "sym_2");
pb.set_input_sizes(1);
Note that the first connection to pb here is the out variable. We know that there are public input and private witness concepts in zk-SNARKs, which correspond to the primary and auxiliary variables in libsnark respectively. So how to make the distinction in code? We need to use set_input_sizes(n) to declare the number n of public/primary variables connected to the protoboard. Here n = 1, indicating that the first n = 1 variables connected with pb are public, and the rest are private.
So far, all the variables have been successfully connected to the protoboard, and the next thing to be determined is the constraint relationship between these variables. This is also easy to understand. After similar components are inserted into the breadboard, the relationship between them needs to be determined according to the circuit requirements and then connected and soldered. Call the add_r1cs_constraint() function of the protoboard as follows to add r1cs_constraint of the form a * b = c to pb. Namely r1cs_constraint
// x*x = sym_1
pb.add_r1cs_constraint(r1cs_constraint
// sym_1 * x = y
pb.add_r1cs_constraint(r1cs_constraint
// y + x = sym_2
pb.add_r1cs_constraint(r1cs_constraint
// sym_2 + 5 = ~out
pb.add_r1cs_constraint(r1cs_constraint
So far, the constraints between variables have also been added, and the circuit for the proposition has been constructed. Let's enter the second step of the "four steps" mentioned above: use the generation algorithm (G) to generate public parameters (pk and vk) for the proposition, that is, trusted setup. The generated proving key and verification key can be obtained through keypair.pk and keypair.vk respectively.
const r1cs_constraint_system
const r1cs_gg_ppzksnark_keypair
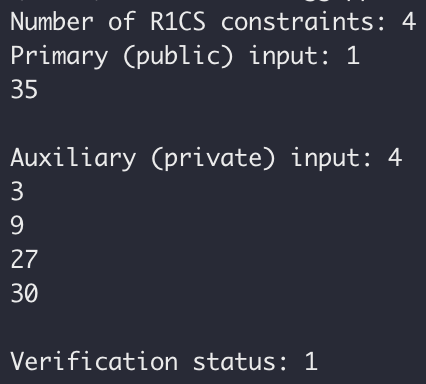
Go to the third step to generate a certificate. First provide specific values for public input and witness. It is not difficult to see that x = 3, out = 35 is a solution to the original equation. Then assign values to x, out and each intermediate variable in turn.
pb.val(out) = 35;
pb.val(x) = 3;
pb.val(sym_1) = 9;
pb.val(y) = 27;
pb.val(sym_2) = 30;
Then pass the values of public input and witness to the prover function for proof, which can be accessed through pb.primary_input() and pb.auxiliary_input() respectively. The generated proof is saved with the proof variable.
const r1cs_gg_ppzksnark_proof
Finally we verify the proof using the verifier function. If verified = true, the proof verification is successful.
bool verified = r1cs_gg_ppzksnark_verifier_strong_IC
From the log output, it can be seen that the verification result is true, the number of R1CS constraints is 4, and the numbers of public input and private input are 1 and 4 respectively. The log output is as expected.
In practical applications, trusted setup, prove, and verify will be carried out by different roles. The final effect is that the prover will give the verifier a short proof and public input, and the verifier can verify whether a proposition is true by itself. For the previous example, it is possible to verify that the prover knows a secret x so that x^3 + x + 5 = out can be established without knowing the specific solution x of the equation.
With just a few dozen lines of code, you can easily manipulate the latest research results of zk-SNARKs in academia.
5. Get hands-on again
Through the above examples, we have seen all the important steps to develop zk-SNARKs circuits using the libsnark library.
Now let's consolidate it with a new example: Prove that the number is less than 60 without revealing the size of the secret number.
How should this thing that can be done with one operator in a regular program be expressed under libsnark?
The main workload and difficulty of zk-SNARKs circuit development is how to "precisely" describe all the constraints in the proposition with code. Once the description is not "accurate", the constraints are either missed or wrongly written, and the content that the final circuit wants to prove will be far from the original proposition. The examples in the previous section only involve simple multiplication and addition, which is consistent with the most basic form of r1cs_constraint, so the expression of constraints is relatively easy. In addition, almost all constraints are not very intuitive, and it is difficult for beginners to describe the details of constraints correctly.
Luckily libsnark already implements a lot of basic circuit widgets for us. A number of gadgets are provided under gadgetlib1 and gadgetlib2 which are ready to use. Among them, gadgetlib1 is more commonly used, and it collects hash calculations including sha256, merkle tree, pairing and other circuit implementations.
DangDangDang, the comparison_gadget in gadgetlib1/gadgets/basic_gadgets.hpp is exactly what we need.
comparison_gadget(protoboard
const size_t n,
const pb_linear_combination
const pb_linear_combination
const pb_variable
const pb_variable
const std::string &annotation_prefix="")
The gadget needs to pass in many parameters: n indicates the number of digits, A and B are the two numbers to be compared, and less and less_or_eq are used to mark whether the relationship between the two numbers is "less than" or "less than or equal to". The principle of the gadget implementation is simply to convert the comparison between A and B into 2^n + B - A bitwise representation. The specific implementation also uses a number of other basic gadgets, which can be passed through comparison_gadget
Here you need to create the following variables, connect x and max to pb, and set the max value to 60, which represents the upper limit of the value.
protoboard
pb_variable
pb_variable
x.allocate(pb, "x");
max.allocate(pb, "max");
pb.val(max)= 60;
Use comparison_gadget to create cmp, fill in the previous parameters, and call the generate_r1cs_constraints() method that comes with the gadget. At the same time, add another constraint, requiring less * 1 = 1, that is, less must be true.
comparison_gadget
cmp.generate_r1cs_constraints();
pb.add_r1cs_constraint(r1cs_constraint
Enter witness (secret value x), say let x = 18. Here also need to call the generate_r1cs_witness method of comparison_gadget.
// Add witness values
pb.val(x) = 18; // secret
cmp.generate_r1cs_witness();
The rest is consistent with the previous example, that is, it can be proved that a number is less than 60 without disclosing the size of the secret number. In the same way, a "range proof" that limits the maximum and minimum values of the value is implemented.
With the help of a powerful basic library, we have achieved the proof requirements with shorter code.
6. What's NEXT?
After reading this, I believe everyone has a preliminary understanding of how to use libsnark and zk-SNARKs circuit development.
You may have discovered that libsnark is relatively simple to use, and the real focus is on zk-SNARKs circuit development. As mentioned earlier, code must be used to "precisely" describe all the constraints in the proposition to be proved. "Missing" or "wrongly writing" constraints will make the content of the proof very different from the original intention, making the proof meaningless.
How to correctly and efficiently convert real business logic into zk-SNARKs circuit codes is exactly what our developers need to continuously study and practice.
Fortunately, we already have a libsnark proving ground, and we can easily modify and add codes to try.
No matter how complex the circuit implementation is, it is formed by combining and packaging simpler "circuit components" one by one. Therefore, the basic library that comes with libsnark is a very important learning material - not only to learn how to use them, but also to study their implementation principles.
We can also understand how to apply ZKP to actual business by reading the circuit implementation of other projects, such as HarryR'sethsnarks-miximusand Loopring'sprotocol3-circuits. From these projects, you can learn how to engineer and develop larger-scale circuits, as well as various design optimization details related to circuit performance, and at the same time have a deeper understanding of the scale of circuit constraints.
At the same time, everyone is welcome to continue to pay attention to the follow-up articles of "Zero-knowledge proof Learn by Coding: libsnark series" by Ambi Lab. Next time we will try to combine zk-SNARKs with smart contracts, circuit modular development, more complex libsnark implementation cases, The pits that are easy to step on during the circuit development process will be further discussed.
7. Appendix
main.cpp
The first example, main.cpp, calls the sample code of the official example of libsnark. Through this example, you can understand the basic usage process and main functions of libsnark.
#include
#include
#include
#include
using namespace libsnark;
/**
* The code below provides an example of all stages of running a R1CS GG-ppzkSNARK.
*
* Of course, in a real-life scenario, we would have three distinct entities,
* mangled into one in the demonstration below. The three entities are as follows.
* (1) The "generator", which runs the ppzkSNARK generator on input a given
* constraint system CS to create a proving and a verification key for CS.
* (2) The "prover", which runs the ppzkSNARK prover on input the proving key,
* a primary input for CS, and an auxiliary input for CS.
* (3) The "verifier", which runs the ppzkSNARK verifier on input the verification key,
* a primary input for CS, and a proof.
*/
template
bool run_r1cs_gg_ppzksnark(const r1cs_example
{
libff::print_header("R1CS GG-ppzkSNARK Generator");
r1cs_gg_ppzksnark_keypair
printf("\n"); libff::print_indent(); libff::print_mem("after generator");
libff::print_header("Preprocess verification key");
r1cs_gg_ppzksnark_processed_verification_key
libff::print_header("R1CS GG-ppzkSNARK Prover");
r1cs_gg_ppzksnark_proof
printf("\n"); libff::print_indent(); libff::print_mem("after prover");
libff::print_header("R1CS GG-ppzkSNARK Verifier");
const bool ans = r1cs_gg_ppzksnark_verifier_strong_IC
printf("\n"); libff::print_indent(); libff::print_mem("after verifier");
printf("* The verification result is: %s\n", (ans ? "PASS" : "FAIL"));
libff::print_header("R1CS GG-ppzkSNARK Online Verifier");
const bool ans2 = r1cs_gg_ppzksnark_online_verifier_strong_IC
assert(ans == ans2);
return ans;
}
template
void test_r1cs_gg_ppzksnark(size_t num_constraints, size_t input_size)
{
r1cs_example
const bool bit = run_r1cs_gg_ppzksnark
assert(bit);
}
int main () {
default_r1cs_gg_ppzksnark_pp::init_public_params();
test_r1cs_gg_ppzksnark
return 0;
}
test.cpp
The second example test.cpp. This example shows how to use libsnark to build the simplest circuit.
#include
#include
#include
using namespace libsnark;
using namespace std;
int main () {
typedef libff::Fr
// Initialize the curve parameters
default_r1cs_gg_ppzksnark_pp::init_public_params();
// Create protoboard
protoboard
// Define variables
pb_variable
pb_variable
pb_variable
pb_variable
pb_variable
// Allocate variables to protoboard
// The strings (like "x") are only for debugging purposes
out.allocate(pb, "out");
x.allocate(pb, "x");
sym_1.allocate(pb, "sym_1");
y.allocate(pb, "y");
sym_2.allocate(pb, "sym_2");
// This sets up the protoboard variables
// so that the first one (out) represents the public
// input and the rest is private input
pb.set_input_sizes(1);
// Add R1CS constraints to protoboard
// x*x = sym_1
pb.add_r1cs_constraint(r1cs_constraint
// sym_1 * x = y
pb.add_r1cs_constraint(r1cs_constraint
// y + x = sym_2
pb.add_r1cs_constraint(r1cs_constraint
// sym_2 + 5 = ~out
pb.add_r1cs_constraint(r1cs_constraint
const r1cs_constraint_system
// generate keypair
const r1cs_gg_ppzksnark_keypair
// Add public input and witness values
pb.val(out) = 35;
pb.val(x) = 3;
pb.val(sym_1) = 9;
pb.val(y) = 27;
pb.val(sym_2) = 30;
// generate proof
const r1cs_gg_ppzksnark_proof
// verify
bool verified = r1cs_gg_ppzksnark_verifier_strong_IC
cout << "Number of R1CS constraints: " << constraint_system.num_constraints() << endl;
cout << "Primary (public) input: " << pb.primary_input() << endl;
cout << "Auxiliary (private) input: " << pb.auxiliary_input() << endl;
cout << "Verification status: " << verified << endl;
}
range.cpp
The third example range.cpp. This example uses the comparison_gadget that comes with libsnark to realize the value range proof.
#include
#include
#include
#include
using namespace libsnark;
using namespace std;
int main () {
typedef libff::Fr
// Initialize the curve parameters
default_r1cs_gg_ppzksnark_pp::init_public_params();
// Create protoboard
protoboard
pb_variable
pb_variable
x.allocate(pb, "x");
max.allocate(pb, "max");
pb.val(max)= 60;
comparison_gadget
cmp.generate_r1cs_constraints();
pb.add_r1cs_constraint(r1cs_constraint
const r1cs_constraint_system
// generate keypair
const r1cs_gg_ppzksnark_keypair
// Add witness values
pb.val(x) = 18; // secret
cmp.generate_r1cs_witness();
// generate proof
const r1cs_gg_ppzksnark_proof
// verify
bool verified = r1cs_gg_ppzksnark_verifier_strong_IC
cout << "Number of R1CS constraints: " << constraint_system.num_constraints() << endl;
cout << "Primary (public) input: " << pb.primary_input() << endl;
cout << "Auxiliary (private) input: " << pb.auxiliary_input() << endl;
cout << "Verification status: " << verified << endl;
}